
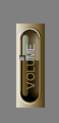
You will see from 'The Look' theme that we also have a Volume control and this is a Talisman plugin which you will find in the 'Plugins' folder of Talisman.I have used all the plugins at one time or another in my themes and generally.once you have inserted a plugin,you are able to drag it to the location on your desktop where you want it.Thats the way the plugin .ini files are set by default.For some reason at the time of writing this tutorial,that does'nt happen for me only with regard to the Volume plugin and i dont know why.Therefore i shall proceed with the hope that you unlike me,can drag the volume button when inserted,to the correct spot as you can see in 'The Look' theme.
As for me i have to change the co-ordinates before i get the volume buttton just where i want it ( I shall be mentioning to Talisman ) ok so the first thing is to get the nessesary files from the plugin folder and copy and paste them to the 'My Theme' folder.The files you need to copy are, Lvolume.ini (Configuration settings),Lvolumeback.bmp and Lvolumeslider.bmp.Ok,go get em!!
Now these files are in your theme folder we can instruct talisman to show the plugin each time the theme starts.We do this by inserting a 'startplugin' command in the
'Autostart' box of the 'Theme' dialogue properties.Open the Editor and select the 'Theme' button under 'System'. in the 'Autostart' box click the browse button to the right and from the dropdown menu select 'misc' and click 'startplugin'.This will appear in your box
You must now alter the command to read 'startplugin Lvolume' and click 'Redraw'. The volume plugin will not show now until you restart the theme.So close the Editor
rightclick your desktop and choose 'My Theme' form the theme list to restart.You should now have the volume control sitting in lower part of the desktop area.Before you attemp to drag it anywhere, we need to change the bmp's for the volume to match our theme.For the time being we shall use my bmp's from 'The Look' theme.Therefore go to 'The Look' theme folder' copy the Lvolumeback and Lvolume slider bmp's and paste them into the 'My Theme' folder.Once done,restart the theme and the bmp image for the volume will have changed to
Now we have the right image but its vertical instead of horizontal and its in the wrong place,so we have to change it.We shall use the editor to make these changes.Open the Editor and in the 'Objects' column at the botton you will see talisman has automatically put the volume properties button in.Click it.We now have the 'Plugin' Lvolume properties which are the same as the Lvolume.ini file. If you make any changes here,the .ini file will automatically be updated and the same goes for the reverse.To change the orientation form vertical to horizontal click in the box to the right of the 'orientation' button and change to '0' instead of '1'.Click 'Redraw' and you will see the volume control has change to horizontal.It is at this point that we need to put the control in the right position ( refer back to the image of 'The Look' Taksbar shown above ).It should be just to the right of the Amp button.Now to all intents and purposes,you should be able to drag it there and the new position will automatically be updated in the .ini file by talisman.As i said previously, i cannot for some reason do this so i need to change the co-ordinates manually. Try to put the volume control in position by dragging it to the right location. Did it go ,i dont know,so i'll tell you how to do it manually.Open the Editor and go to the Lvolume properties.There are 3 values you need to change here and they are the xf value,thats from right to left, the yf value,thats from top to bottom and the sx2 which is actually the width of the volume control image.You need to change the sx2 value otherwise your volume control will not function to its full capacity.
make the following changes;
xf =110
yf = 734
sx2 = 82 ( being the width of the bmp image i made ).
Click 'Redraw' and the volume control should leap into the correct position.Enough said on this now and any queries post to the Tutorial forum.
Well that just about covers the taskbar for now.lets turn our attention to forms.
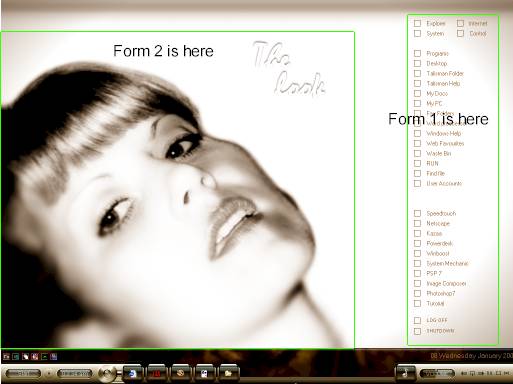
In 'The Look' there are two forms and we shall add them to our theme using exactly the same dimensions.See below.
Lets make form 1.On the desktop rightclick and select 'New' then'Form' then 'Empty form'. The properties for this form are now on view in the editor.
Change the 'Position' co-ordinates as follows, x = 10, y = 30, width = 192, height = 680 and 'Align' down arrow. Make the colour of the form Black and check the 'caching' box as this will make the form react more quickly to your button.
You will see from the form properties that you may add an image to the form ('Wallpaper') you can assign a program or whatever to 'Autostart',you have 3 closeform options
and 14 different ways for the form to appear on the screen.( 'Effect open' ) and you can add buttons to the form but i prefer to do that later.
In 'The Look' this form i have set to appear using the 'Tranparency' effect,the same for form2.But i want to show you a method of Autohiding a form as i mentioned previously,So in the 'Close method' box check 'Autohide' and choose 'Right to Left' in the 'Effects open' box, click 'Redraw, and close the editor.
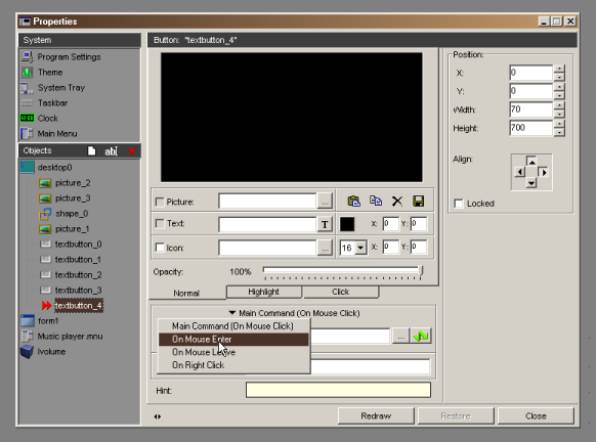
In order to open a form set to 'Autohide' you need to create a button and that button MUST be within the area of the form it is to open.This is going to be a special button
because it will cover almost the entire right edge of your desktop and it will be transparent.lets create it.Right click on the right hand side of the desktop and choose 'New' then 'Textbutton'. Now right click on the button and choose 'properies' and we now have the Editor open ready to make our configuration.It is important to make all your changes at one time or you may find the co-ordinates will change after you click 'redraw'. So firstly delete the text from the 'TEXT' box, in the 'command' area click the 'main command (on mouse click)' button and select 'On mouse Enter'. In the command box type 'showform form1', in the 'Position' area enter the folowing co-ordinates
x =0, y = 0, width = 70 and height = 700, 'Align' up and right arrows.Doublecheck all your changes and when satisfied only then click 'Redraw'.Your tranparent button is in place Try it!! when you mouse to the left of your desktop , Form1 will automatically appear and then disappear when your mouse leaves the form.Any problems recheck the transparent button co-ordinates. When the form is open and your mouse is on the form,you can then add buttons to the form in the usual manner,alternatively,Talisman allows you to drag and drop .exe files direct from an open explorer window straight onto the open form where you can then make changes to the button via the editor.
Now for form2 which in 'The Look' happens to contain an image of my wife from a photograph i took.
This form is only used to show an image and is therefore set to appear automatically when the theme starts and stays on show at all times.Ok,Rightclick the desktop as before and choose 'New',then form,then empty form.Make the following changes.....x = 0, y = 72, width = 783 and height = 629.Make the colour blue,change the 'Effect open' to'Tranparency' and check the 'caching' box.Make sure the 'Close method' has 'Only by command' checked.Finally click 'Redraw'.
Now we need to make Talisman show this form on startup.
Open the Editor and in the 'Objects' column click 'desktop0'. Now in the 'Autostart' box type 'startform form2'. Finally click 'Redraw' and close the editor.
Testing time, Restart your theme and you will now see form2 appear.
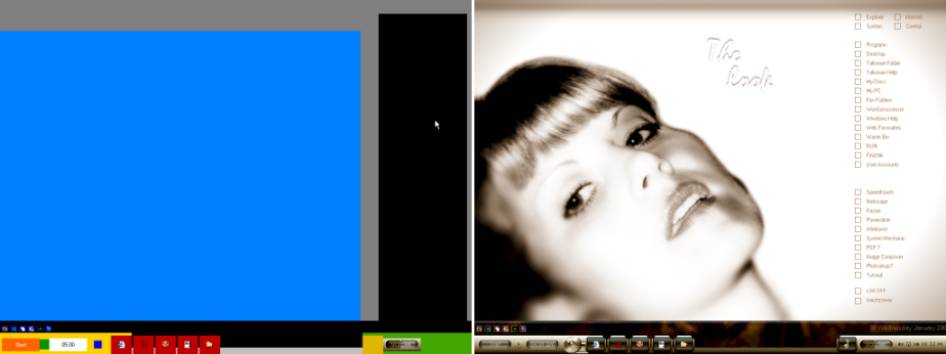
Finally here are the two themes side by side so you can see the layouts.What you do with the graphics is up to you.
Ok Thats just about it for now.I expect you are busting with questions and thats what the new Tutorial Forum at www,lighttek.com has been setup for so get posting.
If this tutorial is found to be of use,i shall follow it with a more advanced tutorial covering such things as script files,Animations,Flash ojects.html wallpapers,Browser windows etc etc.So bye for now and i hope this tutorial has been of some use to you.
Bob Starck-Higgins.